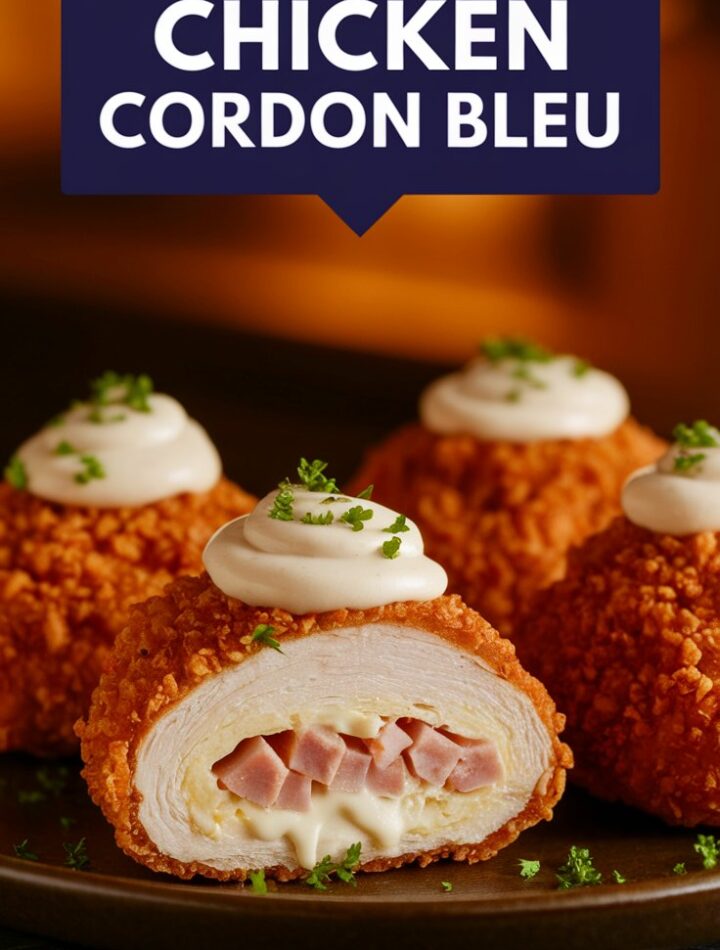
Few dishes manage to strike the perfect balance between elegance and comfort food the way Chicken Cordon Bleu does. At its heart, it is a simple preparation of chicken, ham, and cheese, but when breaded, cooked until golden, and served with a creamy Dijon Parmesan sauce, it transforms into a restaurant-quality meal.
This guide goes far beyond a standard recipe. You’ll learn not only how to make Creamy Chicken Cordon Bleu step by step but also its history, essential tips, the best side dishes to serve with it, and clever ways to adapt it to your lifestyle. Whether you are cooking for a family dinner, planning an intimate date night, or hosting guests, this recipe will help you create an unforgettable meal.
What is Chicken Cordon Bleu?
Chicken Cordon Bleu originated from the European tradition of wrapping meat with cheese and ham. The term cordon bleu, meaning “blue ribbon” in French, historically signified dishes of the highest culinary honor. Although the dish gained widespread popularity in Switzerland and France, it became especially famous in American households during the mid-20th century.
The modern version typically features chicken breast pounded thin, layered with ham and Swiss cheese, rolled tightly, coated in breadcrumbs, and fried or baked. The creamy Dijon sauce is a more recent twist, adding richness and depth to an already impressive dish.
Why You’ll Love This Creamy Chicken Cordon Bleu Recipe
- Crispy and golden: A panko breadcrumb crust ensures maximum crunch.
- Cheesy and savory: Melty cheese paired with smoky ham balances flavors beautifully.
- Rich, creamy sauce: Dijon mustard and Parmesan elevate the dish into fine dining territory.
- Versatility: Perfect for both everyday meals and special celebrations.
- Make-ahead friendly: Can be prepped in advance and cooked just before serving.
Essential Ingredients and Substitutions
For the Chicken
- Chicken breasts – Choose boneless, skinless breasts of medium size. Overly thick chicken takes longer to cook and may dry out.
- Ham – Thin slices of deli ham work best, but smoked ham or prosciutto can bring added flavor.
- Cheese – Swiss is traditional, but Gruyère, provolone, mozzarella, or even cheddar can be used.
- Breadcrumbs – Panko breadcrumbs make the crust extra crispy. For a softer crust, use regular breadcrumbs.
- Seasonings – Salt, pepper, garlic powder, and onion powder are enough to enhance the chicken without overwhelming the fillings.
For the Creamy Dijon Sauce
- Butter – Provides a rich base for the sauce.
- Garlic – Adds aromatic depth.
- Flour – Essential for thickening the sauce.
- Milk – Whole milk or 2% is preferred for creaminess.
- Dijon mustard – Sharp and tangy, it cuts through the richness.
- Parmesan cheese – Creates a salty, nutty undertone.
- Optional substitutions: Use plant-based butter, almond milk, and gluten-free flour for dietary adjustments.
Tools and Equipment You’ll Need
- Meat mallet or rolling pin – To flatten chicken evenly.
- Plastic wrap or parchment paper – For rolling and chilling the chicken.
- Sharp knife – For slicing clean medallions.
- Three shallow bowls – For flour, eggs, and breadcrumbs.
- Large frying pan or Dutch oven – For frying.
- Tongs – To handle chicken safely in hot oil.
- Oven and wire rack – To finish cooking without losing crispiness.
- Saucepan – For preparing the Dijon sauce.
Step-by-Step Cooking Instructions
Step 1: Pound and Season the Chicken
Place a chicken breast between two sheets of plastic wrap. Pound it evenly to about ½ inch thick. Season with salt, pepper, garlic powder, and onion powder on both sides.
Step 2: Layer Cheese and Ham
Lay down 2 slices of Swiss cheese, followed by 2 slices of ham. Repeat once more. Keep layers thin so the chicken can roll easily.
Step 3: Roll and Chill
Roll the chicken tightly, tucking in the edges to keep the filling secure. Wrap it in plastic wrap, twist the ends, and refrigerate for at least 30 minutes. This step ensures the roll holds together during frying or baking.
Step 4: Bread the Chicken
Set up three bowls:
- Flour
- Beaten eggs
- Panko breadcrumbs
Dredge each chicken roll in flour, dip in eggs, then coat with breadcrumbs, pressing gently for an even layer.
Step 5: Fry or Bake
- Frying: Heat oil to 325°F (170°C). Fry each roll for 5 minutes per side until golden.
- Baking: Preheat oven to 375°F (190°C). Bake for 30–35 minutes until the internal temperature reaches 165°F (75°C).
Step 6: Make the Creamy Dijon Sauce
In a saucepan, melt butter and sauté garlic until fragrant. Stir in flour and cook for 1 minute. Gradually whisk in milk until smooth and thickened. Add Dijon mustard, Parmesan, salt, and pepper. Simmer gently, then remove from heat.
Step 7: Slice, Plate, and Serve
Let chicken rest for 5 minutes before slicing into medallions. Drizzle generously with Dijon sauce and garnish with parsley.
Side Dishes That Pair Perfectly
- Garlic Mashed Potatoes – Buttery and creamy, ideal for soaking up sauce.
- Steamed Asparagus with Lemon – A fresh, tangy balance to richness.
- Roasted Brussels Sprouts – Nutty and slightly sweet with caramelized edges.
- Caesar Salad – Crisp lettuce, Parmesan, and tangy dressing.
- Rice Pilaf – Light, aromatic, and soaks up flavors beautifully.
- Honey-Glazed Carrots – Sweet contrast to the savory main dish.
- Buttery Dinner Rolls – Perfect for mopping up leftover sauce.
Common Mistakes and How to Avoid Them
- Overcooking chicken: Always check with a thermometer (165°F is ideal).
- Skipping refrigeration: The roll may unravel if not chilled.
- Wrong oil temperature: Too hot = burnt crust; too cool = greasy breading.
- Using regular breadcrumbs: Results in a less crispy texture.
- Overloading the pan: Causes soggy breading. Fry in small batches.
Expert Tips for Perfect Chicken Cordon Bleu
- Double coat for extra crunch: Dip in egg and breadcrumbs twice.
- Rest before slicing: Locks in juices.
- Use quality cheese and ham: Makes a huge difference in flavor.
- Make it gluten-free: Use gluten-free flour and breadcrumbs.
- Use an oven-safe rack: Keeps the crust crispy when baking.
Storage and Reheating Guide
Refrigeration
Store leftovers in airtight containers for up to 3 days. Keep sauce separate to prevent sogginess.
Freezing
Wrap uncooked rolls tightly in plastic wrap, then foil. Freeze for up to 3 months. Thaw overnight before cooking.
Reheating
- Oven: 350°F for 10–15 minutes (best for crispiness).
- Air fryer: 350°F for 5–7 minutes.
- Microwave: Quick option, but softens crust.
Reheating Sauce
Warm in a saucepan over low heat, stirring frequently. Add a splash of milk if too thick.
Variations of Chicken Cordon Bleu
- Air fryer version – Crispy with less oil.
- Mini chicken bites – Fun for appetizers.
- Low-carb crust – Crushed pork rinds or almond flour instead of breadcrumbs.
- Turkey or fish variation – Substitute chicken with turkey cutlets or white fish fillets.
Nutrition and Health Insights
(Per serving, without sides – approximate)
- Calories: 560
- Protein: 48 g
- Carbohydrates: 25 g
- Fat: 28 g
- Fiber: 1 g
Health tip: Pair with light vegetable sides to balance richness.
Frequently Asked Questions (FAQs)
1. Can I bake instead of fry?
Yes, bake at 375°F (190°C) for 30–35 minutes. Spray with oil for crispiness.
2. What’s the best cheese substitute?
Gruyère for a nutty flavor, or mozzarella for extra meltiness.
3. Can I make it ahead?
Yes, assemble and refrigerate up to 24 hours before cooking.
4. How do I stop cheese from leaking out?
Roll tightly, chill before breading, and seal well with breadcrumbs.
5. Can I freeze cooked Chicken Cordon Bleu?
Yes. Cool completely, wrap tightly, and freeze for up to 3 months.
Conclusion
Creamy Chicken Cordon Bleu is a dish that combines sophistication with comfort. Its crispy crust, cheesy filling, and tangy Dijon sauce make it an irresistible main course for any occasion. By following the step-by-step guide, avoiding common mistakes, and trying out variations, you’ll master this recipe with ease.
Now it’s your turn—try this recipe tonight and enjoy a restaurant-quality meal right from your kitchen. Don’t forget to share your version, pair it with your favorite side dish, and make every dinner table feel like a celebration.