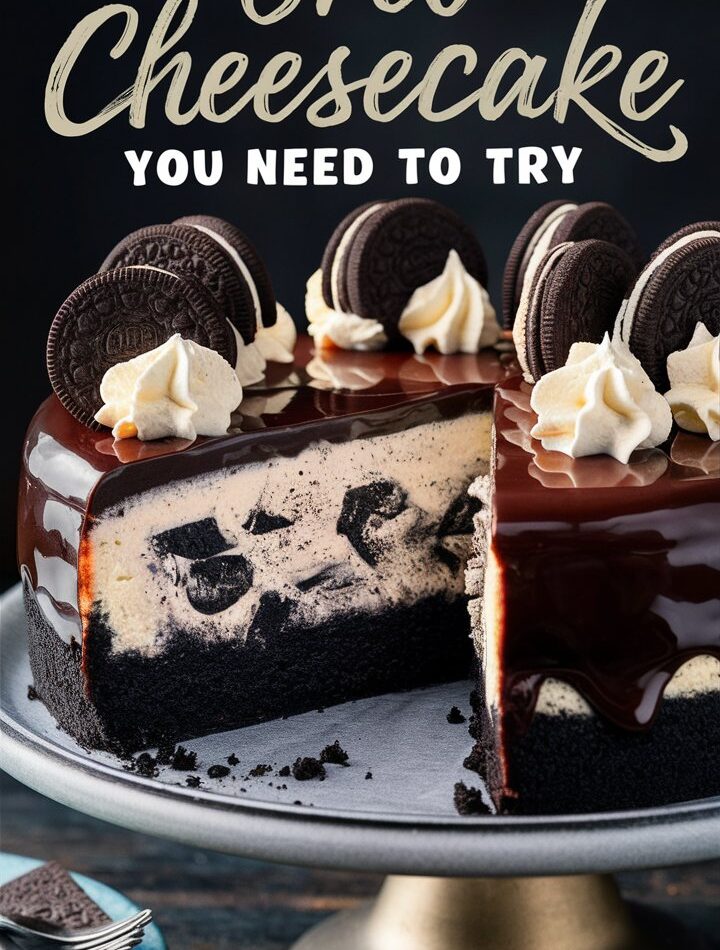
Few desserts rival the universal appeal of cheesecake—its rich, creamy texture paired with an irresistible crust and the endless potential for flavor combinations make it a crowd favorite. But when you fuse the indulgence of cheesecake with the beloved crunch and chocolatey bliss of Oreo cookies, the result is nothing short of spectacular. Introducing the Fantastic Creamy Oreo Cheesecake—a dessert that delivers luxury in every bite, whether you’re celebrating a birthday, hosting a dinner party, or just treating yourself on a quiet weekend.
In this comprehensive, step-by-step guide, you’ll learn everything you need to create this show-stopping dessert—from selecting the right tools and ingredients to mastering the baking process, storing leftovers, and even adding your own flair. Ready to make a dessert everyone will remember? Let’s dive in!
⭐ Why You’ll Absolutely Love This Oreo Cheesecake
Before we get into the nitty-gritty, here’s why this recipe stands out from the rest:
- Luxuriously Creamy Texture: Thanks to a combination of cream cheese, sour cream, and heavy cream, this cheesecake melts in your mouth.
- Oreo Goodness in Every Layer: From the crunchy crust to the cookie-loaded filling and crumbly topping, Oreos are the star.
- Beginner-Friendly Instructions: Clear, easy-to-follow steps make it accessible—even for first-time bakers.
- Make-Ahead Marvel: Perfect for planning ahead—this cheesecake tastes even better the next day!
- Versatile for Any Occasion: Birthdays, holidays, potlucks, or quiet evenings—it suits every celebration.
- Freezer-Friendly: Make now, enjoy later. It stores beautifully.
🛠️ Tools & Equipment You’ll Need
To ensure a smooth and successful cheesecake experience, it’s essential to gather the right tools:
| Tool | Purpose |
|---|---|
| Springform Pan (9-inch) | Easy removal and professional-looking presentation |
| Electric Mixer | Ensures smooth blending without lumps |
| Mixing Bowls | For combining crust and filling ingredients |
| Measuring Cups/Spoons | Precision ensures proper texture and taste |
| Rubber Spatula | Ideal for scraping and folding ingredients |
| Foil Wrap | Prevents water leaks during baking (if using a water bath) |
| Oven Thermometer | Guarantees even temperature during baking |
🧾 Ingredients Breakdown
Here’s everything you’ll need to create this mouthwatering dessert:
🍪 For the Oreo Crust
- 1 ½ cups crushed Oreo cookies (about 20 cookies)
- 3 tablespoons melted butter
🍰 For the Cheesecake Filling
- 2 pounds (900g) cream cheese, room temperature
- 1 ¼ cups granulated sugar
- ¼ cup sour cream, room temperature
- ¼ cup heavy cream
- 4 large eggs, room temperature
- 1 teaspoon pure vanilla extract
- 10 Oreo cookies, roughly chopped
🍫 For the Chocolate Ganache Topping (Optional but Recommended)
- 2 oz semisweet chocolate, finely chopped
- ¼ cup heavy cream
🌟 For Decoration
- Crushed Oreos
- Whipped cream (optional)
- Chocolate shavings or curls (optional)
🔪 Step-by-Step Instructions
🔥 Step 1: Preheat and Prepare the Pan
- Preheat oven to 325°F (165°C).
- Wrap the bottom of a 9-inch springform pan in aluminum foil (to prevent leaks).
- Lightly grease the sides of the pan or line with parchment paper.
🍫 Step 2: Make the Oreo Crust
- Crush the Oreos into fine crumbs using a food processor or zip-lock + rolling pin.
- In a bowl, mix crushed cookies with melted butter until combined.
- Press the mixture into the bottom of the springform pan using the back of a spoon or measuring cup.
- Bake for 10 minutes, then set aside to cool.
🧁 Step 3: Prepare the Cheesecake Filling
- In a large bowl, beat cream cheese until smooth (use medium speed).
- Add sour cream and heavy cream; beat again until well incorporated.
- Gradually add sugar while beating to create a silky batter.
- Add eggs one at a time, mixing slowly after each. Avoid overmixing.
- Stir in vanilla extract.
- Gently fold in the chopped Oreos using a rubber spatula.
🥄 Step 4: Assemble and Bake
- Pour the cheesecake batter over the prepared crust.
- Tap the pan gently on the counter to release air bubbles.
- Optional: Add more Oreo crumbles on top before baking.
- Place the pan in a larger roasting pan filled with 1 inch of hot water (water bath method helps prevent cracking).
- Bake at 325°F (165°C) for 10 minutes, then reduce to 300°F (150°C) and bake for another 60-70 minutes.
📝 Tip: The center should jiggle slightly when done—don’t overbake!
❄️ Step 5: Cool Gradually
- Turn off the oven and leave the cheesecake inside for 1 hour with the door slightly ajar.
- Then remove from oven, run a knife around the edge, and let cool to room temperature on a wire rack.
🧊 Step 6: Refrigerate Overnight
- Cover the cheesecake and refrigerate for at least 8 hours, preferably overnight for best results.
🍫 Step 7: Add Ganache & Serve
- Heat ¼ cup heavy cream until simmering.
- Pour over chopped chocolate and let sit for 1 minute.
- Stir until glossy and smooth.
- Drizzle over the chilled cheesecake.
- Add extra crushed Oreos, whipped cream, or chocolate curls if desired.
🍴 How to Serve Your Fantastic Oreo Cheesecake
Creative Serving Ideas:
- With Fresh Berries: Strawberries or raspberries add tangy contrast.
- Drizzle of Salted Caramel: For a sweet-and-salty edge.
- Mini Jars: Portion into mini jars or glasses for individual servings.
- Topped with Whipped Cream: Always a classic.
- Alongside Coffee or Espresso: Perfect pairing for late-night dessert.
🧠 Expert Tips for Cheesecake Perfection
| Tip | Why It Matters |
|---|---|
| Use room temp ingredients | Prevents lumps and promotes even mixing |
| Avoid overbeating eggs | Helps avoid air pockets that lead to cracks |
| Bake in a water bath | Ensures gentle, even cooking |
| Cool slowly | Sudden temperature changes cause cracks |
| Refrigerate overnight | Enhances flavor and sets texture |
🥶 Storage and Freezing Instructions
Refrigerator Storage
- Store covered in the fridge for up to 5 days.
- Keep in the springform pan or transfer to an airtight container.
Freezer Storage
- Wrap tightly in plastic wrap and foil.
- Freeze whole or slice individually.
- Keeps well for up to 1 month.
- Thaw in the fridge overnight before serving.
🔁 How to Reheat Cheesecake (Yes, Really)
Not everyone prefers cold cheesecake. Here’s how to gently warm it:
| Method | Instructions |
|---|---|
| Microwave | 10–15 seconds per slice on low power |
| Oven | 275°F (135°C) for 10 minutes, covered with foil |
| Stovetop | Warm in a covered non-stick skillet over low heat for 2–3 minutes per side |
❓ Frequently Asked Questions
Q1. Can I use low-fat cream cheese?
Yes, but full-fat provides a richer taste and better texture.
Q2. What if I don’t have a water bath?
You can skip it but place a pan of hot water on the oven rack below the cheesecake to create steam.
Q3. Can I use flavored Oreos?
Absolutely! Try mint, peanut butter, or golden Oreos for fun variations.
Q4. Why did my cheesecake crack?
Cracking is usually due to overmixing, rapid cooling, or skipping the water bath. The good news? Ganache or whipped cream hides cracks beautifully!
🎂 Variations to Try
- Mint Oreo Cheesecake: Add peppermint extract and use mint-flavored Oreos.
- Peanut Butter Oreo Cheesecake: Swirl in melted peanut butter before baking.
- No-Bake Version: Use gelatin in place of eggs and skip the oven.
- Mini Cheesecakes: Use muffin tins with liners for bite-sized desserts.
🍰 Suggested Pairings & Dessert Bar Ideas
To create a full dessert table or themed party spread, consider pairing this cheesecake with:
- Mini Brownie Bites
- Fruit Skewers with Chocolate Drizzle
- Chocolate Mousse Cups
- Vanilla Ice Cream or Sorbet
- Caramel Popcorn (Sweet & Crunchy Accent)
🧾 Nutrition Information (Per Slice)
Approximate values based on 12 servings.
- Calories: 480
- Fat: 32g
- Carbs: 40g
- Sugar: 28g
- Protein: 7g
🧁 Final Thoughts: Why This Oreo Cheesecake is Truly Fantastic
The Fantastic Creamy Oreo Cheesecake isn’t just another dessert—it’s an experience. Its creamy texture, chocolatey crunch, and stunning presentation make it a showstopper. Whether you’re impressing guests or indulging solo, this dessert will never disappoint.
Once you try this homemade version, you’ll never look at store-bought cheesecake the same way again. It’s flexible, foolproof, and endlessly delicious. Plus, it freezes beautifully, which means you can always keep a slice of happiness on standby.


