Sourdough bread has a reputation for taking a long time, often requiring overnight fermentation and multiple steps. But what if you could enjoy a freshly baked, crusty sourdough loaf in a single day? This guide will show you how to make Speedy Same Day Sourdough Bread, giving you a soft, tangy interior and golden, crunchy crust—all without compromising flavor or texture. Whether you’re a beginner or an experienced baker, this guide has everything you need to master this art.
Why This Sourdough Recipe Is Different
Traditional sourdough recipes can take 12–24 hours from start to finish, which is perfect if you have patience—but not ideal for busy schedules. This same-day sourdough recipe simplifies the process without sacrificing flavor. By using active, bubbly sourdough starter and strategic folding techniques, we accelerate fermentation and develop structure and taste quickly.
Key benefits include:
- No overnight fermentation: Enjoy a fresh loaf in under 8 hours.
- Beginner-friendly: Simple steps with clear instructions.
- Versatile: Perfect for sandwiches, toast, or even just with butter and honey.
- Minimal ingredients: Uses pantry staples you already have.
Essential Ingredients for Success
The ingredients for a successful same-day sourdough loaf are simple, but quality matters:
- All-Purpose Flour (410g)
Provides structure. You can mix with bread flour for extra chewiness. - Water (290g)
Lukewarm water encourages fermentation. Filtered water is ideal to avoid chlorine, which can inhibit yeast. - Sourdough Starter (160g)
Must be active and bubbly. This is the living yeast that makes your bread rise. - Salt (8g)
Enhances flavor and strengthens gluten structure.
Optional enhancements: seeds (sesame, sunflower), herbs, or garlic for flavor variations.
Understanding Your Sourdough Starter
Your sourdough starter is the heart of the bread. It’s a natural mixture of flour and water fermented with wild yeast and beneficial bacteria. Using a well-fed, active starter ensures a strong rise and tangy flavor.
Tips for an active starter:
- Feed 4–12 hours before baking.
- It should double in size and appear bubbly.
- Float test: a teaspoon of starter in water should float if ready.
A weak starter will lead to dense, under-risen bread, so never skip this step.
Tools and Equipment You’ll Need
- Dutch Oven: Traps steam, giving a crisp crust.
- Bread Lame or Sharp Knife: For scoring the dough before baking.
- Mixing Bowl & Spoon: For initial dough mixing.
- Tea Towel or Banneton: Supports dough during final proofing.
- Parchment Paper: Helps transfer dough safely into the Dutch oven.
Optional: bench scraper for easier handling and dough shaping.
Step-by-Step Instructions
1. Mixing the Dough
- Combine water, sourdough starter, and salt in a large bowl.
- Add flour gradually and mix until fully incorporated.
- Use your hands to form a rough dough ball.
- Cover and let rest for 30 minutes (autolyse phase) to allow flour to absorb water.
Pro Tip: Resting improves gluten development without kneading.
2. Stretch & Folds: Developing Gluten
- Grab one edge of the dough, stretch it upward, and fold it over itself.
- Rotate the bowl 90° and repeat until you’ve completed 4 folds.
- Cover and let rest 20 minutes.
- Repeat four times over 1 hour.
This technique strengthens the dough, improving rise and structure, and creates an open, airy crumb.
3. Bulk Fermentation
- Cover the dough and let it rise for 3–4 hours at room temperature.
- Dough should nearly double in size and feel slightly springy.
Tip: Cooler kitchens slow fermentation; place dough in a slightly warm oven if needed.
4. Shaping the Dough
- Transfer dough to a floured surface.
- Gently pull the edges toward the center to form a tight ball.
- Flip the dough seam-side down and pull slightly toward you to tighten the shape.
Shaping ensures even rising and a smooth loaf surface.
5. Final Proofing
- Line a banneton or bowl with a floured tea towel.
- Place dough seam-side up, cover, and let rise 2 hours at room temperature.
- Dough should spring back slowly when gently pressed.
Tip: Over-proofing leads to collapse; under-proofing leads to dense bread.
6. Preheating and Baking
- Preheat oven to 460°F (238°C) with the Dutch oven inside for at least 30 minutes.
- Carefully transfer dough onto parchment paper, floured side up.
- Score the dough with a sharp knife or lame.
- Place dough (with parchment) in the Dutch oven, add a splash of water to create steam, and cover.
- Bake 30 minutes covered, then 10 minutes uncovered at 440°F (227°C) for golden crust.
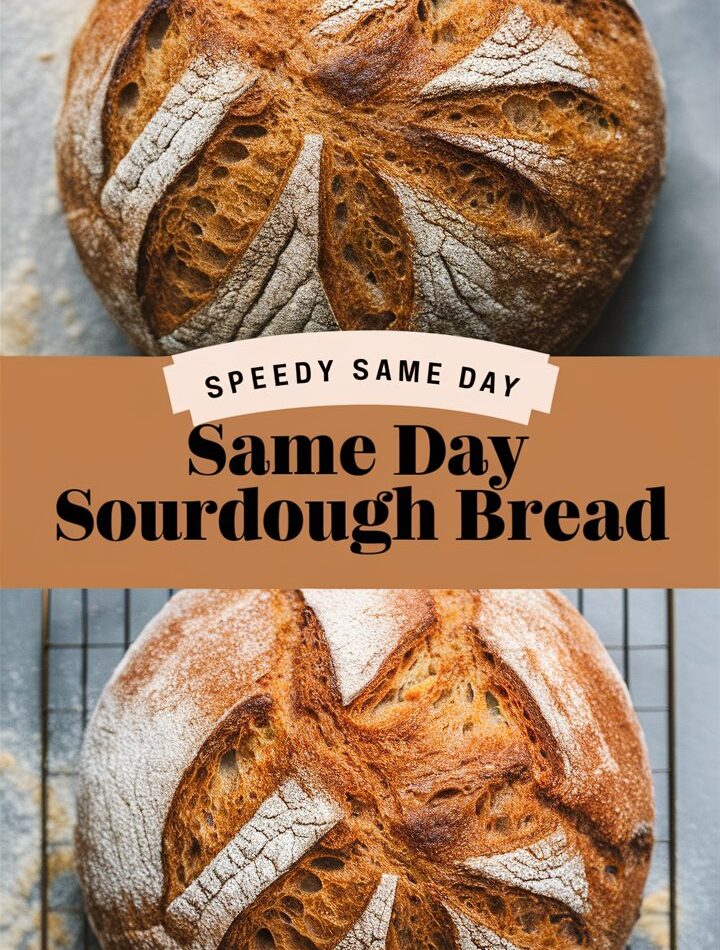
Scoring Techniques for Beautiful Loaves
Scoring directs where the bread expands during baking:
- Simple slash: Single line down the middle.
- Crisscross: Two perpendicular slashes for a rustic look.
- Decorative: Use multiple short slashes or patterns; requires practice.
Tip: Use a very sharp blade and cut swiftly to avoid deflating dough.
Troubleshooting Common Problems
| Problem | Cause | Solution |
|---|---|---|
| Dense bread | Starter inactive, under-proofed | Use active starter, extend bulk fermentation |
| Flat loaf | Over-proofed | Reduce proofing time, monitor dough rise |
| Sticky dough | Too much water | Adjust water slightly, flour hands/surface |
| Hard crust bottom | Oven too hot | Use a baking sheet under Dutch oven |
| Weak oven spring | Insufficient scoring | Deep, strategic scoring with sharp blade |
Tips for Faster Proofing and Better Crust
- Place dough in a warm oven (turned off) if room temperature is cool.
- Keep oven closed first 30 minutes to trap steam.
- Use serrated knife for slicing to avoid squishing.
- For extra tang, let dough ferment slightly longer in the bulk stage.
Serving Suggestions and Pairings
Speedy sourdough is versatile. Pair it with:
- Avocado Toast: Top with salt, pepper, and red pepper flakes.
- Breakfast Sandwiches: Eggs, cheese, bacon, or veggies.
- Grilled Cheese: Crispy exterior, melty cheese inside.
- Soups: Tomato, chowder, or minestrone.
- Bruschetta: Tomatoes, basil, olive oil, and balsamic drizzle.
- Charcuterie Boards: Meats, cheeses, olives, and spreads.
- Simple Enjoyment: Warm with butter or honey.
Storage and Reheating Guide
- Room Temperature: Paper bag, up to 2 days.
- Freezing: Wrap tightly, up to 3 months.
- Reheating: Warm at 300°F (150°C) for 10 minutes to refresh crust.
Frequently Asked Questions (FAQs)
Q: Can I bake without a Dutch oven?
A: Yes, use a baking stone and a tray of hot water for steam.
Q: What if my starter isn’t very active?
A: Feed it and wait until it doubles in size and is bubbly.
Q: Can I let the dough rise overnight?
A: Yes, refrigerate after bulk fermentation and bake the next day.
Q: How do I know if the bread is fully baked?
A: Tap the bottom; it should sound hollow. Internal temperature: 205–210°F (96–99°C).
Expert Tips for Beginner Bakers
- Use kitchen scale: Accurate measurements improve consistency.
- Don’t rush: Even “same-day” sourdough needs proper proofing.
- Learn your oven: Temperature fluctuations affect crust.
- Take notes: Track starter activity, proofing times, and oven settings.
Final Thoughts: Mastering Same-Day Sourdough
Making sourdough in a single day is not just possible—it’s enjoyable. With practice, you’ll understand your starter, dough behavior, and oven, producing perfectly crusty loaves that taste as good as any bakery bread. The Speedy Same Day Sourdough Bread is flexible, forgiving, and rewarding, giving you a fresh loaf with minimal waiting.